Showing posts with label desktop. Show all posts

Tuesday, February 28, 2012

Desktop Virtualization

Many IT organizations now-a-days are looking at desktop virtualization to upgrade their entire approach to desktop management. Today, individual desktops are hard-coded combinations of OS, apps and user settings, and managed one-by-one on an ongoing basis. Desktop virtualization is a solution where one moving part doesn’t have to disrupt any of the other moving parts in order to make a change. It is the concept of separating a personal computer desktop environment from the physical machine through a client-server computing model.

One of the most significant benefits of desktop virtualization is that it gives IT administrators an easy and centralized way to manage employees' computers. Instead of each computer being separate, administrators create just a handful of VMs or VM templates for different roles within a company. For instance, a company may create one VM for each worker in a research and another for each sales representative. These VMs would include not just the operating system, but also any applications and drivers the employee would need. Such deployments work best where many employees need essentially the same functionality

Vendors providing support for desktop virtualization There are large numbers of vendors providing deskop virtualization solutions. Below mentioned are the top among the lot
• Microsoft – Microsoft Virtual PC, Remote desktop services, etc.
• Citrix -        Citrix XenDesktop
• VMware -   VMware View, VMware v Sphere, etc.
• Symantec -  Endpoint Visualization

Diagrammatic representation of desktop virtualization
Advantages
1.Simpler provisioning of new desktops.
2.Reduced downtime in the event of server or client hardware failures.
3.Desktop image management capabilities.
4.Secure remote access to the enterprise desktop environment.
5.Desktop Virtualization offers major savings on expending on physical computer systems by easily installing and configuring VMs on a single computer system

Limitations
1.Compatibility – Not all applications can be virtualized easily.
2.Potential security risks if the network is not properly managed.
3.Some loss of user autonomy and privacy.
4.Challenges in setting up and maintaining drivers for printers and other peripherals.
5.Difficulty in running certain complex applications such as multimedia.
6.Increased downtime in the event of network failures.
7.Complexity and high costs of VDI deployment and management

Thursday, February 9, 2012

Add the Command Prompt to the Windows Explorer Right-Click Menu

A hidden functionality in Windows allows you to right click on a directory, and select “Command Prompt Here” from the menu.
Here’s the registry hack to get this working. Make sure you back up your registry just in case. it’ll show you the step-by-step method, but you can skip down to the bottom for the alternate reg file.

Step-By-Step Method:
Type regedit.exe into the Start\Run dialog, and then navigate to the following registry key:

 HKEY_CLASSES_ROOT\Directory\shell Once you are at that key, right click and choose the New Key option:
Name the key “CommandPrompt” without the quotes and then double-click on the default value. Change the text to “Command Prompt Here” as seen here:
Right click on the new Command key and select New key, as you did before. Name the new key Command as well, and then double-click the default value of that key. Set the text of that key to this: cmd.exe /k cd %1 You can see what it should look like here:
Now when you right click on the folder, you should see this dialog:
That will open up a prompt like this:
Alternate method: You can create a text file named anything.reg, and insert this text into it:
Windows Registry Editor Version 5.00
[HKEY_CLASSES_ROOT\Directory\shell\CommandPrompt]
@=”Command Prompt:”
[HKEY_CLASSES_ROOT\Directory\shell\CommandPrompt\Command]
@=”cmd.exe /k cd %1
Double click on that file, and the text will be entered into the registry, and you’ll have the same right click command prompt.

Sunday, January 29, 2012

Procedure to remove Khatra.exe virus manually

1. Go to task manager and select regsvr.exe(if found), gHost.exe , khatra.exe , Xplorer.exe rt click and select end process tree. press WIN+r or start>RUN

2.type cmd and hit enter
3.GO to the the drive where your OS is installed
4.In the command prompt make sure you get the command line as c:\ or d:\ (this can be achieved by the command "cd .." without quotes)
5.Type attrib -s -h -r khatra.exe Repeat the same process for the location c:\windows\system32
6.type del khatra.exe
7.Follow the same process for gHost.exe & Xplorer.exe as they are also part of the virus. To make sure that the virus is out of you pc ,
check your registry
1.win+R type regedit
2.ctrl+F type in search one by 1 the names of the
3.processes i.e khatra,gHost,Xplorer
4.search the entire registry n go-on deleting the values you find.

Tuesday, January 24, 2012

Install Windows Recovery Console in Windows Boot Menu

If you want to repair Windows installation but can’t get into the Recovery Console of the CD Rom as was the problem of one of our readers, then here is way to install the Recovery Console directly inside the Windows Boot Menu

if you want to access the recovery console but you can do this directly from your drive and not CD, so that you don’t have to search the CD in case of a Windows Failure this will be a good procedure
Steps:
1. Insert the Windows XP CD in the CD Drive but make sure that both the service pack in the CD and the one installed are same.
2. Now open Run Box, and type the command X:\i386\winnt32.exe /cmdcons where X is your CD drive letter.
3. A Windows Setup box will come up, click Yes to proceed

4. Another dialog box will come up reading “Windows Recovery Console has been successfully installed”.

Just restart the computer to start using the Recovery Console directly in the computer without the CD

Monday, January 23, 2012

Hide or Show ‘Safely Remove Hardware’ icon from Taskbar

A small informative post for today that lets you know (in case you don’t already know), how to remove and show the “Safely Remove Hardware” icon from Taskbar.
Hiding or removing the icon is not that difficult and if you want to clear your task bar of the green icon then following are the steps
Steps:
1. Right click on the Task Bar and select properties 
2. Now click on the Customize button and in case if it is greyed out then check the box “Hide Inactive Icons” 3. In the list of the Current Items, change the behavior of “safely Remove Hardware” from Hide when Inactive to Always Hide
This is it; the icon will not appear again. Reverse process will make the icon to appear again

Using Windows 7 or Vista Compatibility Mode

Windows Vista or Windows 7, will have problems running some older versions of applications, just because so much has changed under the hood from Windows XP days. There is a compatibility mode that can be easily set per application. To configure the compatibility mode for an application, just locate the installation directory and right click on the .exe, selecting Properties from the menu.
Select the Compatibility tab:
You can choose to run the program in Windows XP compatibility mode, or even all the way back to Windows 95 compatibility.
Probably the most useful setting to start off with would be to disable the visual themes and desktop composition, if you can’t get things working. If you are trying to run a video game, you will often need to choose “Run this program as an administrator”. You’ll have to play around with it, but most likely you can get your application working this way.

Friday, January 20, 2012

Disable AutoPlay in Windows Vista

Windows Vista’s AutoPlay options are a great improvement over Windows XP in terms of flexibility, but unfortunately there are so many options that it can be confusing, especially since there’s no specific mention of USB Flash drives in the options. Open your Control Panel, and then click on “Play CDs or other media automatically” to open the AutoPlay dialog.
Disable AutoPlay Globally
The quickest way to disable AutoPlay entirely is to just uncheck the box for “Use AutoPlay for all media and devices”, which should usually work.

Disable for a Single 
Type You can choose a setting in the drop-down menu for a single type of drive, for instance Audio CD in this example. For this to work you’ll have to make sure to keep the global autoplay option on, and then choose the specific setting in the drop-down.

Disable for just Removable (flash) Drives 
The problem here is that while there are settings for Audio CDs and DVDs, there’s nothing specifically for USB flash drives. Windows will determine the drive type based on the content it finds on the flash drive itself, so that’s what we’ll need to change In order to disable AutoPlay for the removable drives, you should change all of the following to Take no action: Software and games, Pictures, Video files, Audio files, and Mixed content.

Disable Through Group Policy 
If you’d like to disable it entirely you can use the Group Policy editor on the Business and Ultimate versions of Vista Open up gpedit.msc through the start menu search box, browse to Windows Components \ AutoPlay Policies, and change the value of “Turn off Autoplay” to enabled.

You can choose whether to disable for just removable devices, or entirely.

Run Windows XP on Windows 7

it’s been a long time since the release of Windows 7 but there are few individuals who are not impressed with Windows 7 and want to continue with XP

Windows XP is so simple and easy to use that not everyone wants to come out of XP. So if you are using Windows 7 but also wants XP back then Windows 7 has something interesting for you.

 The feature is called “XP mode on windows 7” and it can enable you to continue with XP while using Windows 7. This feature works with the feature called Windows Virtual PC. Other advantage of this feature is that while Windows 7 is compatible with most of the applications in XP, in case there is some application that runs only on XP then you can run it easily.

The only thing to note is that you must have Windows 7 Professional, Enterprise, or Ultimate to run Windows XP Mode. Download link for the same is given below

http://www.microsoft.com/windows/virtual-pc/download.aspx

Tuesday, January 3, 2012

Thin Clint Concepts and Overview


Thin Clients are low powered computers that do not have a hard disk drive. Since there is no hard disk drive, there is also no operating system. Since these are low powered systems, all processing is done on the server instead of the thin client itself. Certain types of thin clients (running on embedded X
P or embedded Linux) may have full fledged OS capabilities complete with installed applications such as Microsoft or Open Office and browsers such as Internet Explorer and/or Mozilla Firefox. 

BOOTING PROCESS WITHOUT LOCALD HDD AND OS All Thin Clients boot up directly from a server which is running the operating system (Windows 2003 Server, Windows 2000 Advanced Server or even Linux). Thin Clients may boot either directly from the server via PXE boot and then connect to it or boot up from locally installed mini disk running Windows XP embedded (Win XPe), Windows CE embedded (Win CEe) or Linux embedded (Le) and then connect to the server. Once connected to the server, the user gets the log in screen of the operating system running on the server. Please bear in mind that booting from a server and connecting to a server are two different processes, since you can have more than one server -one simply for booting up and the second or even a third or more for connecting to (where the applications are installed and processing takes place) depending upon architecture. If required, an enterprise can also go in for a hybrid architecture consisting of both Windows and Linux Terminal servers. 

Applications installation and user data storage 
All applications are installed on the connecting server and every user has his own "My Documents" folder created where his profile, documents, etc. are stored.Applications and software to be installed and run in a Thin Client environment All common programs can be used with Thin Clients...to name a few MS Office; various browsers for surfing; e-mail clients like Outlook Express, Microsoft Outlook, etc.; ERP packages -including SAP; Coreldraw, Adobe Photoshop, Pagemaker, Tally, MS SQL based packages, chatting (using keyboard) programs and even open source and customized packages. 

Software packages that cannot be used on Thin Clients Heavy graphical games, animation packages like Maya and such others that require a very fast screen refresh cannot be used. 

No Of Thin Clients can be made to run on a single server This depends upon the server hardware configuration, the choice of operting system and the programs/applications that are installed on that particular server. Typically, a small office with 10 Thin Clients can be well served by a P-IV machine with 1GB of RAM with Windows Server 2003 Standard edition (that supports up to 4GB of RAM. Enterprise edition + SP2 supports upto 64GB. For increased RAM support, 64 bit versions are apt wherein the Standard edition + SP2 can support 32GBwhile Enterprise + SP2 can support 2TB ). Increase the RAM to 2GB and the users to 20 to 25 without any problem. For users on an enterprise level, a Xeon based server with dual or more processors, a minimum of 4GB RAM and redundancy on storage devices by way of RAID, network adaptors and power supply unit is recommended. Load balancing technology with additional servers prevents any single server from reaching critical levels. These are of course, broad guidelines. Actual server hardware and architecture will most definitely vary from case to case

Connecting Printers on a Thin Client node 
Printers can be installed on a Thin Client node either on a parallel port or USB port. The printer is physically installed on the Thin Client node but in configured on the server as a local printer printing to a TCP/IP port. In case of embedded systems, the printer in configured locally on the Thin Client itself

Devices a Thin Client access locally Most devices like local hard disk drives, pen drives, floppy disk drives and optical drives can be accessed by the Thin Client without any problem. For other devices like scanners, multi function devices and CD/DVD writer, if required on a Thin Client, our embedded systems are recommended, one that is running Win XPe. 

Thin Clients and Citrix Citrix metaframe server installed on the Remote Server will enable the Thin Clients to work across a relatively slow WAN link also by using the ICA protocol instead of Remote Desktop (RDP). 

Hard disk on my Thin Client Though not required, but if we do have or want a hard disk, we can have a dual boot system, whereby you can work either on the server or on the local hard disk 

Thursday, December 29, 2011

Resolution of SKU011 Error in Ms Office

It happens to most Windows users; one day out of the blue your PC decides it doesn't want to let you run any of the Microsoft Office applications. Most likely, you have receive the "Installation Error: File not Found" error message as seen in below snapshot
This is another classic misleading windows error message, which causes you to rummage the internet for the file sku011.cab when in fact; you didn't have this file on your computer when Microsoft Office was working! In the next section, we will discuss the overall approach to fixing the problem at hand. All though Microsoft’s error messages reads "A required installation SKU011.CAB could not be found" and the dialogue box prompts for the location of this file, this is not the underlying cause of the problem, it is just a symptom. The root of the problem lies within the Window's Registry. Part of the initialization of Microsoft Office, values are pulled out of the registry in order for the application to execute as the user would expect the program to run. When the CDCache is set to a value other than 0, Windows tries to perform a supplemental install that http://www.sku011cab.com deems to be unnecessary. Updating the CDCache value in the registry to 0, fixes the issue pertaining to sku011.cab. In short, no additional file needs to be downloaded and the next section gives a step by step instruction to update your Microsoft Office CDCache value to 0. In start / execute : Regedit HKEY_LOCAL_MACHINE -> Software -> Microsoft -> Office -> 11.0 -> Delivery You should have this key 90000409-6000-11D3-8CFE-0150048383C9 Click on it and (at the
right of your screen), right clik on CDCache key. and type 0 as new value

In start / execute : Regedit HKEY_LOCAL_MACHINE -> Software -> Microsoft -> Office -> 11.0 -> Delivery You should have this key 900004
09-6000-11D3-8CFE-0150048383C9 Click on it and (at the right of your screen), right clik on CDCache key. and type 0 as new value

Tuesday, December 27, 2011

windows 7 advantages and disadvantages

Advantages:

1. Windows 7 is faster than its predecessors, both in terms of installation and boot up time.
2. Calculator has been enhanced with some new features like unit conversion, calculations like fuel economy and auto lease payment.
3. WordPad in Windows 7 has improved much better and look similar to the Microsoft Office Word. It can be used to open, edit file names with docx extension which was earlier introduced with MS-Office 2007. Word prediction is the new feature in Word Pad. Realistic brush has been added in Paint.
4. Microsoft facilitates in windows 7, to download some eye-catching themes and background images from its own Microsoft website or from RSS feed. It allows the user to customize every part of the themes and save for our future use or send to the other windows 7 users.
5. It also supports advanced touch and handwriting recognition.
6. Windows 7 supports Virtual Hard Disks with the support of enhanced performances of multi core processors.
7. Windows Media Player 12 has got much enhanced features in the Windows 7 and drag and drop option has been added which were not there in the previous versions.
8. Windows 7 allows the user to make the best use of graphic cards from the different vendors.
9. Bitlocker is a feature which provides encryption for the internal drives in vista, but it is extended to the external drives in windows 7. This makes backup and restore much easier.
10. Default settings of User Account have been eliminated, to protect form the unauthorized software to be installed.
11. Windows 7 has included a new concept, jumplists which organize the recently used files as well as web pages.
12. More than that, it also allows the user to overcome the clutter in the desktop by introducing three new features Aero Peek, Aero shake and snap.
13. Home networking has been made much easier than its previous operating systems and is probably safe from hackers.

 Disadvantages:


1. Some of the users are not satisfied with the new features, because, they need to buy out additional resources such as RAM, etc to make use of them.
2. It is expensive than the previous Microsoft operating systems.
3. Some of the users have problems such as; their system hangs after installing Windows 7
4. If the user has got an HP multifunction printer, and its driver being upgraded to the Windows 7, then the printer doesn’t response to the print commands. So, the user needs to go to the new HP solution Center to resolve this problem.
5. Windows have specific themes for United Kingdom, Germany, Canada, Japan, South Africa and Australia, if the user is not from the above country and he wish to have a specific theme of his country, he will not get that, hence the user will not satisfied with that feature.
6. Some of the features like Start Menu user interface, Windows Ultimate Extras, InkBall, Windows Photo Gallery, Windows Movie Maker, Windows Calendar Windows Mail called Windows Live Essentials were included in Vista are removed in Windows 7.


Saturday, December 10, 2011

Diagnostic for WINDOWS Operating Systems

Diagnostic for WINDOWS Operating Systems: Diagnostics for Windows will display information about the computer's hardware and software configuration and test the computer to ensure it is operating properly Download Link: http://h18000.www1.hp.com/support/files/hpcpqnk/us/download/19228.html

• Microsoft Windows 95
• Microsoft Windows 98
• Microsoft Windows NT 4.0
• Microsoft Windows 2000
• Microsoft Windows Millennium Edition (ME)
• Microsoft Windows XP Home Edition
• Microsoft Windows XP Professional
• Microsoft Windows Server 2003

1. Download the SoftPaq to a directory on your hard drive. The file downloaded is a self-extracting executable with a filename based on the SoftPaq Number above.

2. Execute the downloaded file and follow the on-screen instructions.

To create the four optional installation diskettes, run MAKEDISK.BAT and follow on-screen instructions.

3. To install Interactively: a) Delete all previous versions of Diagnostics for Windows 1.xx. Since the DFW 1.xx is a 16-bit application that does not have an uninstall, simply delete the C:\WINDOWS\CPQDIAG directory.

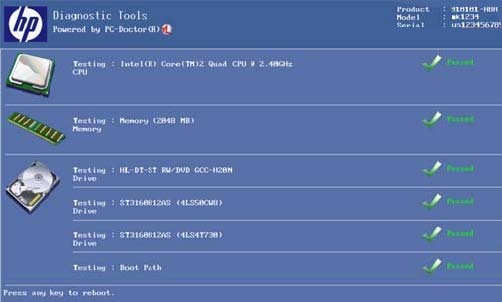
Figure 13: Screen example: Diagnostic Tools test

c) Install this version of Diagnostics for Windows -Insert diskette #1 into drive A: if installing from optional diskettes -Run A:\SETUP.EXE or \SETUP.EXE where is directory from step 2 -Select Next -Select Finish

4. After the installation is completed, you may delete the directory created in step 2 if you wish.


Running the test from the startup screen (boot)

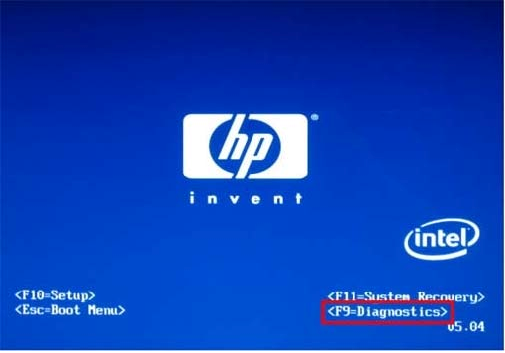
If your computer was manufactured in 2008 or later, you may be able to run a hardware diagnostic test during the startup process. To do so, turn on the computer and press the F9 key during the screen with the HP or Compaq logo.

Figure 12: Example of Boot screen that displays the key press to enter the BIOS test.


Using the Bootable Diagnostic CD 

If you cannot access Windows Vista or the Recovery Manager, you can use a Bootable Diagnostic CD to run the Hardware Diagnostic Tools. The Bootable Diagnostic CD is created using the Hardware Diagnostic Tools in Windows Vista. For more information about creating the Bootable Diagnostic CD, see Using Hardware Diagnostic Tools from Windows . Once you have created the Bootable Diagnostic CD, use these steps to run Hardware Diagnostic Tools from the CD: 

1. Insert the Bootable Diagnostic CD into the CD drive. 
2. Restart the computer. 
3. On the Language Selection screen, type the letter that corresponds to your language. For example, type A to select English. 
4. On the Introduction screen, press the spacebar to continue. 
5. From the Symptoms menu, press the number key that corresponds to the symptom you are experiencing. If you are not sure which symptom to use, press the 4 key to run the basic test suite. 
6. Based on the symptom you chose, the Hardware Diagnostic Tools run tests on your computer hardware. 

Three test results are possible: 

Passed: No problems were detected for the hardware device tested. This may indicate that the computer issue is caused by software program and not the hardware.

Failed: A problem was detected with the hardware device. Make a note of the error code in the test log. To view the test log, press the spacebar to return to the Symptoms menu, then press the 7 key. 

Aborted: The test was cancelled by the user. 

Share

Twitter Delicious Facebook Digg Stumbleupon Favorites More