


Diagnostic for WINDOWS Operating Systems: Diagnostics for Windows will display information about the computer's hardware and software configuration and test the computer to ensure it is operating properly Download Link: http://h18000.www1.hp.com/support/files/hpcpqnk/us/download/19228.html
• Microsoft Windows 95
• Microsoft Windows 98
• Microsoft Windows NT 4.0
• Microsoft Windows 2000
• Microsoft Windows Millennium Edition (ME)
• Microsoft Windows XP Home Edition
• Microsoft Windows XP Professional
• Microsoft Windows Server 2003
1. Download the SoftPaq to a directory on your hard drive. The file downloaded is a self-extracting executable with a filename based on the SoftPaq Number above.
2. Execute the downloaded file and follow the on-screen instructions.
To create the four optional installation diskettes, run MAKEDISK.BAT and follow on-screen instructions.
3. To install Interactively: a) Delete all previous versions of Diagnostics for Windows 1.xx. Since the DFW 1.xx is a 16-bit application that does not have an uninstall, simply delete the C:\WINDOWS\CPQDIAG directory.
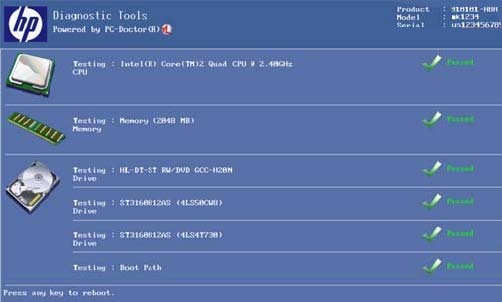
Figure 13: Screen example: Diagnostic Tools test
c) Install this version of Diagnostics for Windows -Insert diskette #1 into drive A: if installing from optional diskettes -Run A:\SETUP.EXE or \SETUP.EXE where is directory from step 2 -Select Next -Select Finish
4. After the installation is completed, you may delete the directory created in step 2 if you wish.
Running the test from the startup screen (boot)
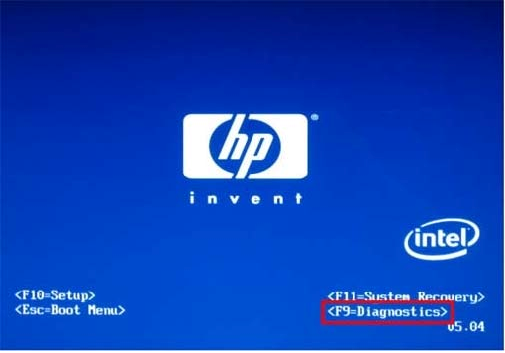
If your computer was manufactured in 2008 or later, you may be able to run a hardware diagnostic test during the startup process. To do so, turn on the computer and press the F9 key during the screen with the HP or Compaq logo.
Figure 12: Example of Boot screen that displays the key press to enter the BIOS test.
• Microsoft Windows 95
• Microsoft Windows 98
• Microsoft Windows NT 4.0
• Microsoft Windows 2000
• Microsoft Windows Millennium Edition (ME)
• Microsoft Windows XP Home Edition
• Microsoft Windows XP Professional
• Microsoft Windows Server 2003
1. Download the SoftPaq to a directory on your hard drive. The file downloaded is a self-extracting executable with a filename based on the SoftPaq Number above.
2. Execute the downloaded file and follow the on-screen instructions.
To create the four optional installation diskettes, run MAKEDISK.BAT and follow on-screen instructions.
3. To install Interactively: a) Delete all previous versions of Diagnostics for Windows 1.xx. Since the DFW 1.xx is a 16-bit application that does not have an uninstall, simply delete the C:\WINDOWS\CPQDIAG directory.
Figure 13: Screen example: Diagnostic Tools test
c) Install this version of Diagnostics for Windows -Insert diskette #1 into drive A: if installing from optional diskettes -Run A:\SETUP.EXE or \SETUP.EXE where is directory from step 2 -Select Next -Select Finish
4. After the installation is completed, you may delete the directory created in step 2 if you wish.
Running the test from the startup screen (boot)
If your computer was manufactured in 2008 or later, you may be able to run a hardware diagnostic test during the startup process. To do so, turn on the computer and press the F9 key during the screen with the HP or Compaq logo.
Figure 12: Example of Boot screen that displays the key press to enter the BIOS test.
Using the Bootable Diagnostic CD
If you cannot access Windows Vista or the Recovery Manager, you can use a Bootable Diagnostic CD to run the Hardware Diagnostic Tools. The Bootable Diagnostic CD is created using the Hardware Diagnostic Tools in Windows Vista. For more information about creating the Bootable Diagnostic CD, see Using Hardware Diagnostic Tools from Windows . Once you have created the Bootable Diagnostic CD, use these steps to run Hardware Diagnostic Tools from the CD:
1. Insert the Bootable Diagnostic CD into the CD drive.
2. Restart the computer.
3. On the Language Selection screen, type the letter that corresponds to your language. For example, type A to select English.
4. On the Introduction screen, press the spacebar to continue.
5. From the Symptoms menu, press the number key that corresponds to the symptom you are experiencing. If you are not sure which symptom to use, press the 4 key to run the basic test suite.
6. Based on the symptom you chose, the Hardware Diagnostic Tools run tests on your computer hardware.
Three test results are possible:
Passed: No problems were detected for the hardware device tested. This may indicate that the computer issue is caused by software program and not the hardware.
Failed: A problem was detected with the hardware device. Make a note of the error code in the test log. To view the test log, press the spacebar to return to the Symptoms menu, then press the 7 key.
Aborted: The test was cancelled by the user.


0 comments:
Post a Comment