Showing posts with label server. Show all posts

Sunday, June 17, 2012

How to perform a Primary Restore of Active Directory

1. Reboot the domain controller.
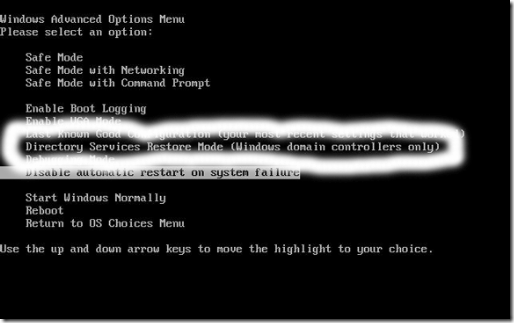
2. During startup, press F8 when prompted, and then select Directory Services Restore Mode (Windows DCs only) from the Windows Advanced Options menu. Press Enter. 
3. Choose the operating system that should be started. Press Enter.
4. When the Safe Mode logon prompt appears, enter the appropriate local administrator account information, and then click OK. Click OK when a message appears, advising that Windows is running in Safe Mode.
5. Click Start, All Programs, Accessories, System Tools, and then click Backup.
6. On the initial page of the Backup or Restore Wizard, click Next.
7. Ensure that the Restore files and settings option is selected on the Backup Or Restore page. Click Next. 8. On the What to Restore page, choose the backup which you want to use for the Primary restore process. Click Next.
9. Click Advanced.
10. On the Where to Restore page, leave the default setting of Original location, unchanged, and then click Next 
11. On the How to Restore page, choose the Replace existing files option. Click Next.
12. When the Advanced Restore Options page appears, enable the When restoring replicated data sets, mark the restored data as the primary data for all replicas checkbox. You can leave all other default settings on the Advanced Restore Options page unchanged.
13. Click Next.
14. Click Finish to start the Primary restore of Active Directory.
15. Reboot the server.

How to perform an Authoritative Restore of Active Directory

1. Perform a Normal Restore of Active Directory.
2. When prompted to restart the server, click No and then close the Windows Backup Utility.
3. Click Start, Run, and enter cmd in the Run dialog box. Click OK.
4. To open the Ntdsutil command-line utility, enter ntdsutil.
5. Enter authoritative restore.
6. To specify Active Directory, or components of Active Directory as authoritative, use one of the following methods:
  •  Enter restore database; this sets the domain and all configuration containers as authoritative. 
  •  Enter restore subtree, together with the distinguished name of the Active Directory object you want to mark as authoritative. 
  •  You can use the verinc option with either of the above commands, to explicitly set the version number. The option is useful when a different Authoritative restore needs to be performed on an existing Authoritative restore. 
7. When the Authoritative Restore Confirmation dialog box appears, asking whether the Authoritative restore should be performed, click Yes.
8. Enter quit, and enter quit again to close the Ntdsutil command-line utility.
9. Proceed to reboot the server 

Tuesday, June 5, 2012

How to perform a Normal Restore of Active Directory

1.Reboot the computer
2.During startup, press F8 when prompted to, and then select Directory Services Restore Mode (Windows DCs only) from the Windows Advanced Options menu. Press Enter.
3.Choose the operating system that should be started. Press Enter
4.When the Safe Mode logon prompt appears, enter the appropriate local administrator account information, and then click OK.
5.Click OK when a messag e appears, advising that Windows is running in Safe Mode
6.Click Start, All Programs, Accessories, System Tools, and then click Backup.
7.On the initial page of the Backup or Restore Wizard, click Next
8.Ensure that the Restore files and settings option is selected on the Backup Or Restore page. Click Next. 9.On the What to Restore page, choose the backup which you want to use for the restore process. Click Next.
10.Click Finish to immediately start a normal restore of Active Directory. If you want to configure advanced option settings, click Advanced, and not the Finish button.
11.When the Where to Restore page appears, choose one of the following optios from the Restore files to list box
  • Original location, this default setting restores files to their original locations 
  • Alternate location, if selected, you can specify a different location to which the files should be restored. 
  • Single folder; this option restores files to a single directory. 
12.Click Next.
13.Click OK if a message is displayed, warning you that a restore of system state data overwrites existing system state data.
14.When the How to Restore page opens, choose between the following options:
  • Leave existing files (Recommended); select this option if you do not want the restore to overwrite any existing files. 
  • Replace existing files if they are older than the backup files; if selected, files older than the backup files are replaced. 
  • Replace existing files; this option replaces all existing files with the backup files 
15.Click Next.
16.When the Advanced Restore Options page is displayed, you can select the following options
  • Restore security settings; is enabled by default. If you disable this checkbox, all files would be restored without any permissions. 
  • Restore junction points, but not the folders and file data they reference; when selected, the restore process is able to restore information on mounted drives. 
  • Preserve existing volume mount points; when selected, existing mounts are protected on the volume. Restore the Cluster Registry to the quorum disk and all other nodes; if applicable for this domain controller, the cluster quorum database is restored. 
  • When restoring replicated data sets, mark the restored data as the primary data for all replicas; this option should be enabled if you are performing a Primary restore of Active Directory. 
17.Click Next. 
18.Click Finish to start the Normal Restore of Active Directory.

Wednesday, February 29, 2012

INSTALLING A VIRTUAL OPERATING SYSTEM(HYPER-V) IN WINDOWS 2008

Open Server Manager and then navigate through the console tree to Roles -> Hyper-V -> Microsoft Hyper-V Server. If this is the first time that you have used Hyper-V, then you will be prompted to accept Hyper-V License Agreement. Once you accept the license agreement, the various Hyper-V options will be made available to you.
The first thing that you must do is to click on the Connect to Server link, located in the Actions pane. When you do, you will be prompted to select the computer that you want to connect to. Choose the Local Computer option, and click OK. You will now see the screen in
Figure A.
Figure A
This is the main screen that you will use for managing virtual machines.

Creating a New Virtual Server
To create a new virtual server, click the New -> Virtual Machine options found in the Actions pane. When you do, Windows will launch the New Virtual Machine Wizard. The wizard’s initial screen explains that you can click Next to begin customizing a virtual machine, but that you also have the option of clicking Finish right now to create a virtual machine that uses the default values. For the purposes of this article, we will create a custom virtual machine so that you can see the options that are available to you.

With that said, click Next and you will be prompted to enter a name and a location for the virtual machine that you are creating. I recommend using a descriptive name. The location is up to you, but if your server contains a striped RAID array, then that is a good location to choose for performance reasons

Click Next and you will be prompted to enter the amount of memory that is to be assigned to the new virtual machine. By default, new virtual machines are assigned 512 MB of RAM, but that isn’t really enough if you plan on running Windows Vista or Windows Server 2008. I would recommend 1 GB for Vista and 2 GB for Windows Server 2008 installations.

Click Next, and the wizard will prompt you to choose which network adapter you want to use for the machine’s virtual network connection. As you may recall, when you installed Hyper-V, you were given the opportunity to select one or more network adapters to be used by virtual machines. This option allows you to pick from the network adapters that you previously selected. The idea is that you can use a different network adapter on each virtual machine if you want, so that no single network adapter becomes over burdened.

When you have made your selection, click Next, and you will be prompted to choose the virtual hard drive that you want the machine to use, as shown in Figure B. As you can see in the figure, you can either create a new virtual hard drive, or you can use an existing one. Since there aren’t any existing virtual hard drives right now, we will have to create a new one. Windows defaults to creating a virtual hard drive that’s 127 MB in size, but you can create a drive of up to 2 TB if you want
Figure B

Click next, and you will be prompted to install an operating system on the new virtual machine. You have the option of installing an operating system later on, but you can also choose to install from a CD (or an .ISO file), a boot floppy, or from an installation server, as shown in Figure C
Figure C
You can choose to install an operating system now.

When you’ve made your choice, click Next. You will now see a summary of the options that you have created. If you have chosen to go ahead and install an operating system, then insert the operating system media, select the option to start the virtual machine, and click Finish. Windows will now launch the virtual machine and begin installing the operating system, as shown in Figure D
Figure D 
Windows will launch the new virtual machine and begin installing the guest operating system. And with that, we are done!

Monday, January 30, 2012

How to Enlarge Data Partitions without losing data after Raid expansion in Linux


Scenario : Customer needs to expand Data volume after expanding array size in Linux.
Possibilities : only Last Partitions can be expanded through Resize2fs
Recommendation : Please ask customer to take backup of File systems/system.

Step to be followed: 

Suppose you have a Partition called c0d0p7 in last cylinder and mounted as a ext3.
#df -h
Filesystem                  Size   Used     Avail   Use%       Mounted on 

/dev/cciss/c0d0p2       15G       4.5G     9.3G    33%        /
/dev/cciss/c0d0p1       99M      12M     83M     12%       /boot
None                          4.0G      0          4.0G     0%        /dev/shm
/dev/cciss/c0d0p6       46G      85M     44G      1%        /name1
/dev/cciss/c0d0p7       46G      103M   44G      1%        /name2

1) Un mount  that file system/Mount point
2) Now you have to remove Journal feature ( if it is ext3 file system) from the file system
# tune2fs -O ^has_journal /dev/cciss/c0d0p7 # tune2fs 1.35 (Date)
Now you have to run e2fsck command to check file systems.
3) root@ff13manish /]# e2fsck -f -y /dev/cciss/c0d0p7 
e2fsck 1.35 (Date) Pass
Pass 1: Checking inodes, blocks, and sizes Pass
Pass 2: Checking directory structure Pass
Pass 3: Checking directory connectivity Pass
Pass 4: Checking reference counts Pass
Pass 5: Checking group summary information
/Name2: 16/6111232 files (6.3% non-contiguous), 209772/12209392 blocks
4) Execute the fdisk -l command 
Disk /dev/cciss/c0d0: 220.1 GB, 220122071040 bytes
255 heads, 63 sectors/track, 26761 cylinders
Units = cylinders of 16065 * 512 = 8225280 bytes
Devic Boot                         Start       End              Blocks           Id        System
System /dev/cciss/c0d0p1      1            13              104391            83       linux
/dev/cciss/c0d0p2                14           1925           15358140        83       linux
Linux /dev/cciss/c0d0p3       1926       3455           12289725        82      linux swap
/dev/cciss/c0d0p4               3456         26761       187205445      5         Extended
/dev/cciss/c0d0p5               3456         9535         48837568+      83       Linux
/dev/cciss/c0d0p6              9536          15615       48837568+       83      Linux
/dev/cciss/c0d0p7             15616        21695         48837568+       83    Linux Original Cylinder size with 46GB

Command (m for help): quit 

“Delete the Last partition and create it again”.

5) [root@ff13manish /]# fdisk /dev/cciss/c0d0

The number of cylinders for this disk is set to 26761. There is nothing wrong with that, but this is larger than 1024, and could in certain setups cause problems with:

a.Software that runs at boot time (e.g., old versions of LILO)
b.Booting and partitioning software from other OS’s (e.g., DOS FDISK, OS/2 FDISK)
Command (m for help): d
Partition number (1-7): 7

“Don’t Quit here  with save option , you have to continue without coming out from fdisk Menu”
Command (m for help): n
First cylinder (15616-26761, default 15616)
Using default value 15616
Last cylinder or +size or +sizeM or +sizeK (15616-26761, default 26761)

Using default value 26761
Command (m for help): p 
Disk /dev/cciss/c0d0: 220.1 GB, 220122071040 bytes
255 heads, 63 sectors/track, 26761 cylinders
Units = cylinders of 16065 * 512 = 8225280 bytes

Device Boot                   Start        End        Blocks            Id     System
/dev/cciss/c0d0p1 *           1             13        104391             83     linux
/dev/cciss/c0d0p2             14           1925     15358140         83     Linux
/dev/cciss/c0d0p3             1926       3455     12289725         82     Linux swap
/dev/cciss/c0d0p4             3456       26761   187205445       5      Extended
/dev/cciss/c0d0p5             3456       9535     48837568+      83     Linux
/dev/cciss/c0d0p6             9536      15615    48837568+      83     Linux
/dev/cciss/c0d0p7             15616    26761    89530213+      83     Linux (Now Size moves to 89 GB)


Command (m for help): w
The partition table has been altered!

Calling ioctl() to re-read partition table.

WARNING: Re-reading the partition table failed with error 16: Device or resource busy.
The kernel still uses the old table. The new table will be used at the next reboot. Syncing disks.
6) Execute Partprobe command 
# partprobe
7) Execute Reszie2fs command
[root@ff13manish /]# resize2fs /dev/cciss/c0d0p7
resize2fs 1.35 (Date)
Resizing the filesystem on /dev/cciss/c0d0p7 to 22382553 (4k) blocks
The filesystem on /dev/cciss/c0d0p7 is now 22382553 blocks long.

8) Now enable ext3 feature in filesystems
tune2fs -j /dev/cciss/c0d0p7
tune2fs 1.35 (Date)
Creating  journal inode: done
This filesystem will be automatically checked every 22 mounts or 180 days, whichever comes first.
Use tune2fs -c or -i to override.
Now check by mounting the filesystems
[root@ff13manish /]# mount  -t ext3 /dev/cciss/c0d0p7  /Name2
[root@ff13manish /]# df -h
Filesystem               Size         Used     Avail     Use%     Mounted on 

/dev/cciss/c0d0p2        15G      4.5G    9.3G        33%          /
/dev/cciss/c0d0p1        99M      12M     83M      12%         /boot
None                             4.0G     0       4.0G        0%          /dev/shm
/dev/cciss/c0d0p6        46G      85M     44G       1%          /Name1
/dev/cciss/c0d0p7        85G      107M    83G      1%         /Name2

Check your data :
[root@ff13vel /]# cd /name2
[root@ff13vel name2]# ls
lost+found  report-4b79378d-0000265d-00000003.zip  RHEL 4 AS UTILITY FOR LINUX
[root@ff13vel name2]# ls -al            
total 104
drwxr-xr-x   4 root root  4096 Feb 17 11:27 .
drwxr-xr-x  29 root root  4096 Feb 17 10:08 ..
drwx------2 root root 16384 Feb 16 17:01 lost+found
-rw-r--r--1 root root 67517 Feb 15 18:27 report-4b79378d-0000265d-00000003.zip
drwxr-xr-x   2 root root  4096 Feb 15 16:57 RHEL 4 AS UTILITY FOR LIN

Tuesday, January 24, 2012

Maintenance Best Practices for Adaptec RAID Solutions

RAID is the most common method of data protection and most companies rely on the redundancy provided by RAID at various levels to protect them from disk drive failures. RAID’s ability to protect data has become increasingly challenging with the exponential increase in drive capacities and the increased use of less reliable drives.RAID cannot protect data against virus attack, human error, data deletion, or natural or unnatural disaster. RAID cannot protect data beyond its advertised disk drive redundancy (for RAID-1, RAID-10, and RAID-5 one drive failure, for RAID-6 two drive failures, for example). Adaptec Technical Support often sees cases where an array is in a degraded state for a longer period of time and data loss then occurs when a further drive finally fails. The best RAID controller cannot help in this situation. In addition to timely maintenance, periodic backup still remains one of the most critical practices in data operations

THE EFFECT OF MODERN LARGER DISK SIZES AND DRIVE QUALITY ISSUES ON RAID

Hard drive media defects and other drive quality issues have steadily improved over time, even as drive sizes have grown substantially. However, hard drives are not expected to be totally free of flaws. In addition, normal wear on a drive may result in an increase in media defects, or “grown defects,” over time. The data block containing the defect becomes unusable and must be “remapped” to another location on the drive. If a bad block is encountered during a normal write operation, the controller marks that block as bad and the block is added to the “grown defects list” in the drive’s NVRAM. That write operation is not complete until the data is properly written in a remapped location. When a bad block is encountered during a normal read operation, the controller will reconstruct the missing data from parity operations and remap the data to the new location. A condition known as a double fault (“bad stripe”) occurs when a RAID controller encounters a bad block on a drive in a RAID volume and then encounters an additional bad block on another hard drive in the same data stripe. This double fault scenario can also occur while rebuilding a degraded array, leaving the controller with insufficient parity information to reconstruct the data stripe. The end result is a rebuild failure with the loss of any data in that stripe, assuming the stripe is in the user data area.
Today, hard drive capacities have increased remarkably, and the likelihood has grown that one or more media defects will occur over the lifespan of the drive. In addition, large arrays take longer to rebuild than small arrays, thus increasing the amount of time the array is not redundant

OVERVIEW OF STEPS THAT CAN BE TAKEN IN KEEPING WITH RAID BEST PRACTICES 
Perform all recommended driver, controller firmware, and Storage Management application (Adaptec Storage Manager) updates

Install Adaptec Storage Manager:
 Adaptec Storage Manager helps you to monitor and maintain Adaptec RAID controllers, enclosures, and disk drives in your storage space from a single location. When Adaptec Storage Manager is installed on a system, the Adaptec Storage Manager Agent is also installed automatically as a service. It’s designed to run in the background, without user intervention, and its job is to monitor and manage system health, event notifications, tasks schedules, and other on-going processes on that system. It sends notices when tasks are completed successfully, and sounds an alarm when errors or failures occur on that system.

Run regular consistency checks on the system: 
Verification is designed to proactively detect hard disk media defects while the array is online and redundant. A RAID-5 or RAID-6 array is inconsistent when the data and parity do not match. Likewise, a RAID-1 array is inconsistent when the data and mirror do not match.
The verification process issues commands to each drive in the array to test all sectors. When a bad sector is found, the RAID controller instructs the hard drive to reassign the bad sector, and then reconstructs the data using the other drives. The affected hard drive then writes data to the newly assigned good sector. These operations continue so that all sectors of each configured drive are checked, including hot spares. As a result, bad sectors can be remapped before data loss occurs.

Two run modes are available to help enhance flexibility and data protection 
1. Background Consistency Check (auto mode): In this mode, the tool is always on. Adaptec Storage Manager continually and automatically checks your logical drives once they’re in use. Once Background Consistency Check has checked all sectors of the array, it repeats this check indefinitely. As its name indicates, Background Consistency Check is always a background or secondary process. Data I/O remains the highest priority for the RAID subsystem.
Note: With this feature enabled, there may be an impact to performance. To enable Background Consistency Check using Adaptec Storage Manager:
• In the Enterprise View, right-click the controller.
• Select Background Consistency Check and then click Enable

Once enabled, the Background Consistency Check period can be adjusted: 
• In the Enterprise view, right-click the controller.
• Click on Background Consistency Check, then select Change period. The Change Background Consistency Check period window opens.
• Adjust the slider control from Very Slow (365 days) to Fast (10 days). Alternatively, in the New Period field, use the arrow keys to increase or decrease the setting.
• Click OK.

 2. Verify with fix (manual mode):
 This mode is used to perform a single, quick check of the array. After the verification process has checked all sectors of the array, it stops and will not start again until started manually by the administrator. In manual mode, the verification process commands are given a higher priority than in Auto mode so that the check completes significantly faster.
Verify with fix is a data-level check and requires more controller resources to read and compare data. Also, because of the additional resources required, verify with fix is not designed to run continuously. Rather, it should be scheduled to run at a regular interval, preferably during periods of low drive activity, or during system maintenance.

To verify and fix a logical drive using Adaptec Storage Manager:
• In the Logical Devices View, right-click the logical drive.
• Select Verify with fix and confirm that you want to verify
• To begin the verification immediately, click Yes. To schedule the verification, click Schedule, and then set the date and time. You can also choose to set the verification as a recurring task. While the verification is in progress,
the logical drive is shown as an animated icon to indicate that the task is in progress. When the verification is complete, an event notice is generated in the local system’s event log.

Monitor Storage Manager Event Logs: You can see status information and messages about the activity (or events) occurring on your storage space by checking component properties and looking at the Event Viewer and status icons in Adaptec Storage Manager. To open a full-screen version of the event log, click the Events button in the tool bar The event log lists activity occurring in your storage space, with the most recent event listed at the top. Double-click any event to open the Configuration Event Detail window to see more information in an easier-to-read format. Adaptec Storage Manager can be configured to send email messages (or notifications) about events on a system in your storage space. We recommend doing this if your storage space is not managed by a dedicated person, or if that particular system is off-site or not connected to a monitor. Email notifications can help you monitor activity on your entire storage space from any location, and are especially useful in storage spaces that include multiple systems running the Adaptec Storage Manager Agent only.
To set up email notifications:
1.In the Configure menu (on the tool bar), select the system you want, and then select Email Notifications. 2.The Email Notifications window opens. The SMTP Server Settings window opens if you haven’t set up email notifications previously.
3.Enter the address of your SMTP server and the “From” address to appear in email notifications. If an email recipient will be replying to email notifications, be sure that the “From” address belongs to a system that is actively monitored.
4.Click OK to save the settings.
5.In the Email Notifications window tool bar, click Add email recipient. The Add Email Recipient window opens.
6.Enter the recipient’s email address, select the level of events for which the recipient will receive an email, and then click Add. Repeat this Step to add more email recipients. Click Cancel to close the window.

You can also set Adaptec Storage Manager to send status alerts about a specified system to all users who are logged into your storage space. When you set Adaptec Storage Manager to broadcast event alerts, all logged-in users receive messages about all types of events. In Windows, these alerts appear as pop-up messages; in all other operating systems, these alerts appear as console messages

Note:Replace drives that have either failed completely, or are starting to show signs of failing (medium errors, S.M.A.R.T. errors, etc.) immediately

Friday, December 30, 2011

Troubleshooting Startup Issues after configuration change on IBM x3550M2, x3650 M2 Servers


Scenario: IMM or system fails after configuration change or IMM reboot -IBM System x3550 M2, x3650 M2.
Symptom
After changing the hardware configuration of System x3550 M2 or System x3650 M2, most often when adding options such as memory, hard drives, and Central Processing Units (CPUs), the system may become unresponsive after about 30 minutes.
Some cases prevented the box from powering on again, and in some cases, power on was possible, but network connectivity to the Integrated Management Module (IMM) was not possible. The issue may also occur when rebooting the IMM while the system is powered on with certain hardware configurations

Affected configurations 
System x3550 M2, type 4198, any model
System x3550 M2, type 7946, any model
System x3650 M2, type 4199, any model
System x3650 M2, type 7947, any model
IMM firmware versions older than YUOO24I version 1.04

Solution 
A fix was provided in IMM firmware yuoo24I (version 1.04).
All users of System x3550 M2 and System x3650 M2 should update to this IMM firmware or later to avoid the possibility of replacing the system board.
The file is available from the 'Software and device drivers ¬IBM System x' web site at the following
URL: http://www.ibm.com/support/docview.wss?uid=psg1MIGR-4JTS2T

Additional information 
An internal buffer overrun issue in the IMM code caused the IMM firmware to repeatedly crash. The internal buffering issue was corrected in yuoo24I. Hardware configurations with large numbers of memory DIMMs and hard disk drives could result in unresponsive systems if the system was powered on and the IMM was rebooted with older firmware

Thursday, December 29, 2011

Difference Between NT & 2000


NT SAM database is a flat database. Where as in windows 2000 active directory
database is a hierarchical database. In windows NT only PDC is having writable copy of SAM database but the BDC is only read only database. In case of Windows 2000 both DC and ADC is having write copy of the database
Windows NT will not support FAT32 file system. Windows 2000 supports FAT32
Default authentication protocol in NT is NTLM (NT LAN manager). In windows 2000 default authentication protocol is Kerberos V5. Windows 2000 depends and Integrated with DNS. NT user Netbios names Active Directory can be backed up easily with System state data

Wednesday, December 28, 2011

Port Number list


Port Number:

This is a list of Internet socket port numbers used by protocols of the Transport Layer of the Internet Protocol Suite for the establishment of host-to-host communications


  1. Number      port
  2. 1         tcpmux
  3. 5          rje
  4. 7        echo
  5. 9       discard
  6. 11       systat
  7. 13      daytime
  8. 15      netstat
  9. 17     qotd
  10. 18     send/rwp
  11. 19     chargen
  12. 20    ftp-data
  13. 21    ftp
  14. 22    ssh, pcAnywhere
  15. 23   Telnet
  16. 25   SMTP
  17. 27   ETRN
  18. 29   msg-icp
  19. 31  msg-auth
  20. 33  dsp
  21. 37  time
  22. 38  RAP
  23. 39  rlp
  24. 42  nameserv, WINS
  25. 43  whois, nickname
  26. 49 TACACS, Login Host Protocol
  27. 50 RMCP, re-mail-ck
  28. 53 DNS
  29. 57 MTP
  30. 59 NFILE
  31. 63 whois++
  32. 66 sql*net
  33. 67 bootps
  34. 68 bootpd/dhcp
  35. 69 Trivial File Transfer Protocol (tftp)
  36. 70 Gopher
  37. 79 finger
  38. 80 www-http
  39. 88 Kerberos, WWW
  40. 95 supdup
  41. 96 DIXIE
  42. 98 linuxconf
  43. 101 HOSTNAME
  44. 102 ISO, X.400, ITOT
  45. 105 cso
  46. 106 poppassd
  47. 109 POP2
  48. 110 POP3
  49. 111 Sun RPC Portmapper
  50. 113 identd/auth
  51. 115 sftp
  52. 117 uucp
  53. 119 NNTP
  54. 120 CFDP
  55. 123 NTP
  56. 124 SecureID
  57. 129 PWDGEN
  58. 133 statsrv
  59. 135 loc-srv/epmap
  60. 137 netbios-ns
  61. 138 netbios-dgm (UDP)
  62. 139 NetBIOS
  63. 143 IMAP
  64. 144 NewS
  65. 152 BFTP
  66. 153 SGMP
  67. 161 SNMP
  68. 175 vmnet
  69. 177 XDMCP
  70. 178 NextStep Window Server
  71. 179 BGP
  72. 180 SLmail admin
  73. 199 smux
  74. 210 Z39.50
  75. 218 MPP
  76. 220 IMAP3
  77. 259 ESRO
  78. 264 FW1_topo
  79. 311 Apple WebAdmin
  80. 350 MATIP type A
  81. 351 MATIP type B
  82. 363 RSVP tunnel
  83. 366 ODMR (On-Demand Mail Relay)
  84. 387 AURP (AppleTalk Update-Based Routing Protocol)
  85. 389 LDAP
  86. 407 Timbuktu
  87. 434 Mobile IP
  88. 443 ssl
  89. 444 snpp, Simple Network Paging Protocol
  90. 445 SMB
  91. 458 QuickTime TV/Conferencing
  92. 468 Photuris
  93. 500 ISAKMP, pluto
  94. 512 biff, rexec
  95. 513 who, rlogin
  96. 514 syslog, rsh
  97. 515 lp, lpr, line printer
  98. 517 talk
  99. 520 RIP (Routing Information Protocol)
  100. 521 RIPng
  101. 522 ULS
  102. 531 IRC
  103. 543 KLogin, AppleShare over IP
  104. 545 QuickTime
  105. 548 AFP
  106. 554 Real Time Streaming Protocol
  107. 555 phAse Zero
  108. 563 NNTP over SSL
  109. 575 VEMMI
  110. 581 Bundle Discovery Protocol
  111. 593 MS-RPC
  112. 608 SIFT/UFT
  113. 626 Apple ASIA
  114. 631 IPP (Internet Printing Protocol)
  115. 635 mountd
  116. 636 sldap
  117. 642 EMSD
  118. 648 RRP (NSI Registry Registrar Protocol)
  119. 655 tinc
  120. 660 Apple MacOS Server Admin
  121. 666 Doom
  122. 674 ACAP
  123. 687 AppleShare IP Registry
  124. 700 buddyphone
  125. 705 AgentX for SNMP
  126. 901 swat, realsecure
  127. 993 s-imap
  128. 995 s-pop
  129. 1062 Veracity
  130. 1080 SOCKS
  131. 1085 WebObjects
  132. 1227 DNS2Go
  133. 1243 SubSeven
  134. 1338 Millennium Worm
  135. 1352 Lotus Notes
  136. 1381 Apple Network License Manager
  137. 1417 Timbuktu
  138. 1418 Timbuktu
  139. 1419 Timbuktu
  140. 1433 Microsoft SQL Server
  141. 1434 Microsoft SQL Monitor
  142. 1494 Citrix ICA Protocol
  143. 1503 T.120
  144. 1521 Oracle SQL
  145. 1525 prospero
  146. 1526 prospero
  147. 1527 tlisrv
  148. 1604 Citrix ICA, MS Terminal Server
  149. 1645 RADIUS Authentication
  150. 1646 RADIUS Accounting
  151. 1680 Carbon Copy
  152. 1701 L2TP/LSF
  153. 1717 Convoy
  154. 1720 H.323/Q.931
  155. 1723 PPTP control port
  156. 1755 Windows Media .asf
  157. 1758 TFTP multicast
  158. 1812 RADIUS server
  159. 1813 RADIUS accounting
  160. 1818 ETFTP
  161. 1973 DLSw DCAP/DRAP
  162. 1985 HSRP
  163. 1999 Cisco AUTH
  164. 2001 glimpse
  165. 2049 NFS
  166. 2064 distributed.net
  167. 2065 DLSw
  168. 2066 DLSw
  169. 2106 MZAP
  170. 2140 DeepThroat
  171. 2301 Compaq Insight Management Web Agents
  172. 2327 Netscape Conference
  173. 2336 Apple UG Control
  174. 2427 MGCP gateway
  175. 2504 WLBS
  176. 2535 MADCAP
  177. 2543 sip
  178. 2592 netrek
  179. 2727 MGCP call agent
  180. 2628 DICT
  181. 2998 ISS Real Secure Console Service Port
  182. 3000 Firstclass
  183. 3031 Apple AgentVU
  184. 3128 squid
  185. 3130 ICP
  186. 3150 DeepThroat
  187. 3264 ccmail
  188. 3283 Apple NetAssitant
  189. 3288 COPS
  190. 3305 ODETTE
  191. 3306 mySQL
  192. 3389 RDP Protocol (Terminal Server)
  193. 3521 netrek
  194. 4000 icq, command-n-conquer
  195. 4321 rwhois
  196. 4333 mSQL
  197. 4827 HTCP
  198. 5004 RTP
  199. 5005 RTP
  200. 5010 Yahoo! Messenger
  201. 5060 SIP
  202. 5190 AIM
  203. 5500 securid
  204. 5501 securidprop
  205. 5423 Apple VirtualUser
  206. 5631 PCAnywhere data
  207. 5632 PCAnywhere
  208. 5800 VNC
  209. 5801 VNC
  210. 5900 VNC
  211. 5901 VNC
  212. 6000 X Windows
  213. 6112 BattleNet
  214. 6502 Netscape Conference
  215. 6667 IRC
  216. 6670 VocalTec Internet Phone, DeepThroat
  217. 6699 napster
  218. 6776 Sub7
  219. 6970 RTP
  220. 7007 MSBD, Windows Media encoder
  221. 7070 RealServer/QuickTime
  222. 7778 Unreal
  223. 7648 CU-SeeMe
  224. 7649 CU-SeeMe
  225. 8010 WinGate 2.1
  226. 8080 HTTP
  227. 8181 HTTP
  228. 8383 IMail WWW
  229. 8875 napster
  230. 8888 napster
  231. 10008 cheese worm
  232. 11371 PGP 5 Keyserver
  233. 13223 PowWow
  234. 13224 PowWow
  235. 14237 Palm
  236. 14238 Palm
  237. 18888 LiquidAudio
  238. 21157 Activision
  239. 23213 PowWow
  240. 23214 PowWow
  241. 23456 EvilFTP
  242. 26000 Quake
  243. 27001 QuakeWorld
  244. 27010 Half-Life
  245. 27015 Half-Life
  246. 27960 QuakeIII
  247. 30029 AOL Admin
  248. 31337 Back Orifice
  249. 32777 rpc.walld
  250. 40193 Novell
  251. 41524 arcserve discovery
  252. 45000 Cisco NetRanger postofficed
  253. 32773 rpc.ttdbserverd
  254. 32776 rpc.spray
  255. 32779 rpc.cmsd
  256. 38036 timestep


Tuesday, December 20, 2011

Video for Install and Configure a DHCP Server win2003

Dynamic Host Configuration Protocol (DHCP) is an IP standard designed to reduce the 
complexity of administering IP address configurations." - Microsoft's definition. A DHCP server would be set up with the appropriate settings for a given network. Such settings would include a set of fundamental parameters such as the gateway, DNS, subnet masks, and a range of IP addresses. Using DHCP on a network means administrators don't need to configure these settings individually for each client on the network. The DHCP would automatically distribute them to the clients itself.


Saturday, December 17, 2011

SQL Kinection - Control SQL Server 2012 with gestures using Microsoft Kinect!

The SQL Server Engineering Team demonstrate SQL Kinection, an experimental project that allows you to control SQL Server 2012 with gestures using Microsoft Kinect. Watch as they create new databases and tables, conduct backups, drop databases, create

Top 10 Features in Windows Server 2008


1. Virtualization

Although it will not be available with the initial launch of Server 2008, Microsoft's Hyper-V 

hypervisor-based virtualization technology promises to be a star attraction of Server 2008 for many 

organisations.

Although some 75 percent of large
businesses have started using virtualization, only an estimated 10 

percent of servers out are running virtual machines. This means the market is still immature. For 

Windows shops, virtualization using Server 2008 will be a relatively low-cost and low-risk way to dip a 

toe in the water.

At the moment, Hyper-V lacks the virtualized infrastructure support virtualization market leader VMware 

can provide. Roy Illsley, senior research analyst at U.K.-based Butler Group, noted that Microsoft is 

not as far behind as many people seem to think, however. "Don't forget Microsoft's System Center, which 

is a fully integrated management suite and which includes VM Manager. Obviously it only works in a 

Wintel environment, but if you have Server 2008 and System Center, you have a pretty compelling 

proposition.

"What Microsoft is doing by embedding virtualization technology in Server 2008 is a bit like embedding 

Internet Explorer into Windows," said Illsley. "This is an obvious attempt to get a foothold into the 

virtualization market."

At launch, Microsoft is unlikely to have a similar product to VMware's highly popular VMotion (which 

enables administrators to move virtual machines from one physical server to another while they are 

running), but such a product is bound to available soon after.

2. Server Core

Many server administrators, especially those used to working in a Linux environment, instinctively 

dislike having to install a large, feature-packed operating system to run a particular specialized 

server. Server 2008 offers a Server Core installation, which provides the minimum installation required 

to carry out a specific server role, such as for a DHCP, DNS or print server. From a security 

standpoint, this is attractive. Fewer applications and services on the sever make for a smaller attack 

surface. In theory, there should also be less maintenance and management with fewer patches to install, 

and the whole server could take up as little as 3Gb of disk space according to Microsoft. This comes at 

a price — there's no upgrade path back to a "normal" version of Server 2008 short of a reinstall. In 

fact there is no GUI at all — everything is done from the command line.

3. IIS

IIS 7, the Web server bundled with Server 2008, is a big upgrade from the previous version. "There are 

significant changes in terms of security and the overall implementation which make this version very 

attractive," said Barb Goldworm, president and chief analyst at Boulder, Colorado-based Focus 

Consulting. One new feature getting a lot of attention is the ability to delegate administration of 

servers (and sites) to site admins while restricting their privileges.

4. Role-based installation Role-based installation is a less extreme version of Server Core. Although 

it was included in 2003, it is far more comprehensive in this version. The concept is that rather than 

configuring a full server install for a particular role by uninstalling unnecessary components (and 

installing needed extras), you simply specify the role the server is to play, and Windows will install 

what's necessary — nothing more. This makes it easy for anyone to provision a particular server without 

increasing the attack surface by including unwanted components that will not do anything except present 

a security risk.

5. Read Only Domain Controllers (RODC)

It's hardly news that branch offices often lack skilled IT staff to administer their servers, but they 

also face another, less talked about problem. While corporate data centers are often physically 

secured, servers at branch offices rarely have the same physical security protecting them. This makes 

them a convenient launch pad for attacks back to the main corporate servers. RODC provides a way to 

make an Active Directory database read-only. Thus, any mischief carried out at the branch office cannot 

propagate its way back to poison the Active Directory system as a whole. It also reduces traffic on WAN 

links.

6. Enhanced terminal services

Terminal services has been beefed up in Server 2008 in a number of ways. TS RemoteApp enables remote 

users to access a centralized application (rather than an entire desktop) that appears to be running on 

the local computer's hard drive. These apps can be accessed via a Web portal or directly by double-

clicking on a correctly configured icon on the local machine. TS Gateway secures sessions, which are 

then tunnelled over https, so users don't need to use a VPN to use RemoteApps securely over the 

Internet. Local printing has also been made significantly easier.

7. Network Access Protection

Microsoft's system for ensuring that clients connecting to Server 2008 are patched, running a firewall 

and in compliance with corporate security policies — and that those that are not can be remediated — is 

useful. However, similar functionality has been and remains available from third parties.

8. Bitlocker

System drive encryption can be a sensible security measure for servers located in remote branch offices 

or anywhere where the physical security of the server is sub-optimal. Bitlocker encryption protects 

data if the server is physically removed or booted from removable media into a different operating 

system that might otherwise give an intruder access to data which is protected in a Windows 

environment. Again, similar functionality is available from third-party vendors.

9. Windows PowerShell

Microsoft's new(ish) command line shell and scripting language has proved popular with some server 

administrators, especially those used to working in Linux environments. Included in Server 2008, 

PowerShell can make some jobs quicker and easier to perform than going through the GUI. Although it 

might seem like a step backward in terms of user friendly operation, it's one of those features that 

once you've gotten used to it, you'll never want to give up.

10. Better security

We've already mentioned various security features built into Server 2008, such as the ability to reduce 

attack surfaces by running minimal installations, and specific features like BitLocker and NAP. 

Numerous other little touches make Server 2008 more secure than its predecessors. An example is Address 

Space Load Randomization — a feature also present in Vista — which makes it more difficult for 

attackers to carry out buffer overflow attacks on a system by changing the location of various system 

services each time a system is run. Since many attacks rely on the ability to call particular services 

by jumping to particular locations, address space randomization can make these attacks much less likely 

to succeed.

It's clear that with Server 2008 Microsoft is treading the familiar path of adding features to the 

operating system that third parties have previously been providing as separate products. As far as the 

core server product is concerned, much is new. Just because some technologies have been available 

elsewhere doesn't mean they've actually been implemented. Having them as part of the operating system 

can be very convenient, indeed.

Saturday, December 10, 2011

Diagnostic for WINDOWS Operating Systems

Diagnostic for WINDOWS Operating Systems: Diagnostics for Windows will display information about the computer's hardware and software configuration and test the computer to ensure it is operating properly Download Link: http://h18000.www1.hp.com/support/files/hpcpqnk/us/download/19228.html

• Microsoft Windows 95
• Microsoft Windows 98
• Microsoft Windows NT 4.0
• Microsoft Windows 2000
• Microsoft Windows Millennium Edition (ME)
• Microsoft Windows XP Home Edition
• Microsoft Windows XP Professional
• Microsoft Windows Server 2003

1. Download the SoftPaq to a directory on your hard drive. The file downloaded is a self-extracting executable with a filename based on the SoftPaq Number above.

2. Execute the downloaded file and follow the on-screen instructions.

To create the four optional installation diskettes, run MAKEDISK.BAT and follow on-screen instructions.

3. To install Interactively: a) Delete all previous versions of Diagnostics for Windows 1.xx. Since the DFW 1.xx is a 16-bit application that does not have an uninstall, simply delete the C:\WINDOWS\CPQDIAG directory.

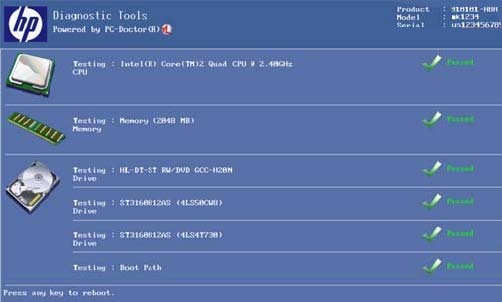
Figure 13: Screen example: Diagnostic Tools test

c) Install this version of Diagnostics for Windows -Insert diskette #1 into drive A: if installing from optional diskettes -Run A:\SETUP.EXE or \SETUP.EXE where is directory from step 2 -Select Next -Select Finish

4. After the installation is completed, you may delete the directory created in step 2 if you wish.


Running the test from the startup screen (boot)

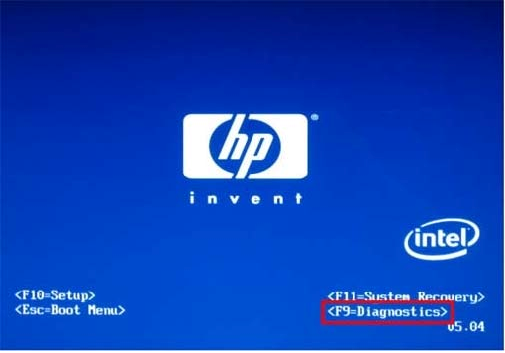
If your computer was manufactured in 2008 or later, you may be able to run a hardware diagnostic test during the startup process. To do so, turn on the computer and press the F9 key during the screen with the HP or Compaq logo.

Figure 12: Example of Boot screen that displays the key press to enter the BIOS test.


Using the Bootable Diagnostic CD 

If you cannot access Windows Vista or the Recovery Manager, you can use a Bootable Diagnostic CD to run the Hardware Diagnostic Tools. The Bootable Diagnostic CD is created using the Hardware Diagnostic Tools in Windows Vista. For more information about creating the Bootable Diagnostic CD, see Using Hardware Diagnostic Tools from Windows . Once you have created the Bootable Diagnostic CD, use these steps to run Hardware Diagnostic Tools from the CD: 

1. Insert the Bootable Diagnostic CD into the CD drive. 
2. Restart the computer. 
3. On the Language Selection screen, type the letter that corresponds to your language. For example, type A to select English. 
4. On the Introduction screen, press the spacebar to continue. 
5. From the Symptoms menu, press the number key that corresponds to the symptom you are experiencing. If you are not sure which symptom to use, press the 4 key to run the basic test suite. 
6. Based on the symptom you chose, the Hardware Diagnostic Tools run tests on your computer hardware. 

Three test results are possible: 

Passed: No problems were detected for the hardware device tested. This may indicate that the computer issue is caused by software program and not the hardware.

Failed: A problem was detected with the hardware device. Make a note of the error code in the test log. To view the test log, press the spacebar to return to the Symptoms menu, then press the 7 key. 

Aborted: The test was cancelled by the user. 

Share

Twitter Delicious Facebook Digg Stumbleupon Favorites More