Sunday, June 17, 2012

How to perform an Authoritative Restore of Active Directory

1. Perform a Normal Restore of Active Directory.
2. When prompted to restart the server, click No and then close the Windows Backup Utility.
3. Click Start, Run, and enter cmd in the Run dialog box. Click OK.
4. To open the Ntdsutil command-line utility, enter ntdsutil.
5. Enter authoritative restore.
6. To specify Active Directory, or components of Active Directory as authoritative, use one of the following methods:
  •  Enter restore database; this sets the domain and all configuration containers as authoritative. 
  •  Enter restore subtree, together with the distinguished name of the Active Directory object you want to mark as authoritative. 
  •  You can use the verinc option with either of the above commands, to explicitly set the version number. The option is useful when a different Authoritative restore needs to be performed on an existing Authoritative restore. 
7. When the Authoritative Restore Confirmation dialog box appears, asking whether the Authoritative restore should be performed, click Yes.
8. Enter quit, and enter quit again to close the Ntdsutil command-line utility.
9. Proceed to reboot the server 

Tuesday, June 5, 2012

How to perform a Normal Restore of Active Directory

1.Reboot the computer
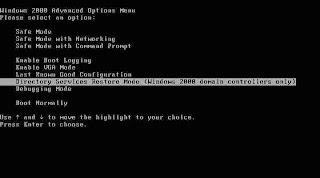
2.During startup, press F8 when prompted to, and then select Directory Services Restore Mode (Windows DCs only) from the Windows Advanced Options menu. Press Enter.
3.Choose the operating system that should be started. Press Enter
4.When the Safe Mode logon prompt appears, enter the appropriate local administrator account information, and then click OK.
5.Click OK when a messag e appears, advising that Windows is running in Safe Mode
6.Click Start, All Programs, Accessories, System Tools, and then click Backup.
7.On the initial page of the Backup or Restore Wizard, click Next
8.Ensure that the Restore files and settings option is selected on the Backup Or Restore page. Click Next. 9.On the What to Restore page, choose the backup which you want to use for the restore process. Click Next.
10.Click Finish to immediately start a normal restore of Active Directory. If you want to configure advanced option settings, click Advanced, and not the Finish button.
11.When the Where to Restore page appears, choose one of the following optios from the Restore files to list box
  • Original location, this default setting restores files to their original locations 
  • Alternate location, if selected, you can specify a different location to which the files should be restored. 
  • Single folder; this option restores files to a single directory. 
12.Click Next.
13.Click OK if a message is displayed, warning you that a restore of system state data overwrites existing system state data.
14.When the How to Restore page opens, choose between the following options:
  • Leave existing files (Recommended); select this option if you do not want the restore to overwrite any existing files. 
  • Replace existing files if they are older than the backup files; if selected, files older than the backup files are replaced. 
  • Replace existing files; this option replaces all existing files with the backup files 
15.Click Next.
16.When the Advanced Restore Options page is displayed, you can select the following options
  • Restore security settings; is enabled by default. If you disable this checkbox, all files would be restored without any permissions. 
  • Restore junction points, but not the folders and file data they reference; when selected, the restore process is able to restore information on mounted drives. 
  • Preserve existing volume mount points; when selected, existing mounts are protected on the volume. Restore the Cluster Registry to the quorum disk and all other nodes; if applicable for this domain controller, the cluster quorum database is restored. 
  • When restoring replicated data sets, mark the restored data as the primary data for all replicas; this option should be enabled if you are performing a Primary restore of Active Directory. 
17.Click Next. 
18.Click Finish to start the Normal Restore of Active Directory.

Wednesday, February 29, 2012

INSTALLING A VIRTUAL OPERATING SYSTEM(HYPER-V) IN WINDOWS 2008

Open Server Manager and then navigate through the console tree to Roles -> Hyper-V -> Microsoft Hyper-V Server. If this is the first time that you have used Hyper-V, then you will be prompted to accept Hyper-V License Agreement. Once you accept the license agreement, the various Hyper-V options will be made available to you.
The first thing that you must do is to click on the Connect to Server link, located in the Actions pane. When you do, you will be prompted to select the computer that you want to connect to. Choose the Local Computer option, and click OK. You will now see the screen in
Figure A.
Figure A
This is the main screen that you will use for managing virtual machines.

Creating a New Virtual Server
To create a new virtual server, click the New -> Virtual Machine options found in the Actions pane. When you do, Windows will launch the New Virtual Machine Wizard. The wizard’s initial screen explains that you can click Next to begin customizing a virtual machine, but that you also have the option of clicking Finish right now to create a virtual machine that uses the default values. For the purposes of this article, we will create a custom virtual machine so that you can see the options that are available to you.

With that said, click Next and you will be prompted to enter a name and a location for the virtual machine that you are creating. I recommend using a descriptive name. The location is up to you, but if your server contains a striped RAID array, then that is a good location to choose for performance reasons

Click Next and you will be prompted to enter the amount of memory that is to be assigned to the new virtual machine. By default, new virtual machines are assigned 512 MB of RAM, but that isn’t really enough if you plan on running Windows Vista or Windows Server 2008. I would recommend 1 GB for Vista and 2 GB for Windows Server 2008 installations.

Click Next, and the wizard will prompt you to choose which network adapter you want to use for the machine’s virtual network connection. As you may recall, when you installed Hyper-V, you were given the opportunity to select one or more network adapters to be used by virtual machines. This option allows you to pick from the network adapters that you previously selected. The idea is that you can use a different network adapter on each virtual machine if you want, so that no single network adapter becomes over burdened.

When you have made your selection, click Next, and you will be prompted to choose the virtual hard drive that you want the machine to use, as shown in Figure B. As you can see in the figure, you can either create a new virtual hard drive, or you can use an existing one. Since there aren’t any existing virtual hard drives right now, we will have to create a new one. Windows defaults to creating a virtual hard drive that’s 127 MB in size, but you can create a drive of up to 2 TB if you want
Figure B

Click next, and you will be prompted to install an operating system on the new virtual machine. You have the option of installing an operating system later on, but you can also choose to install from a CD (or an .ISO file), a boot floppy, or from an installation server, as shown in Figure C
Figure C
You can choose to install an operating system now.

When you’ve made your choice, click Next. You will now see a summary of the options that you have created. If you have chosen to go ahead and install an operating system, then insert the operating system media, select the option to start the virtual machine, and click Finish. Windows will now launch the virtual machine and begin installing the operating system, as shown in Figure D
Figure D 
Windows will launch the new virtual machine and begin installing the guest operating system. And with that, we are done!
Tuesday, February 28, 2012

Desktop Virtualization

Many IT organizations now-a-days are looking at desktop virtualization to upgrade their entire approach to desktop management. Today, individual desktops are hard-coded combinations of OS, apps and user settings, and managed one-by-one on an ongoing basis. Desktop virtualization is a solution where one moving part doesn’t have to disrupt any of the other moving parts in order to make a change. It is the concept of separating a personal computer desktop environment from the physical machine through a client-server computing model.

One of the most significant benefits of desktop virtualization is that it gives IT administrators an easy and centralized way to manage employees' computers. Instead of each computer being separate, administrators create just a handful of VMs or VM templates for different roles within a company. For instance, a company may create one VM for each worker in a research and another for each sales representative. These VMs would include not just the operating system, but also any applications and drivers the employee would need. Such deployments work best where many employees need essentially the same functionality

Vendors providing support for desktop virtualization There are large numbers of vendors providing deskop virtualization solutions. Below mentioned are the top among the lot
Microsoft – Microsoft Virtual PC, Remote desktop services, etc.
Citrix -        Citrix XenDesktop
VMware -   VMware View, VMware v Sphere, etc.
Symantec -  Endpoint Visualization

Diagrammatic representation of desktop virtualization
Advantages
1.Simpler provisioning of new desktops.
2.Reduced downtime in the event of server or client hardware failures.
3.Desktop image management capabilities.
4.Secure remote access to the enterprise desktop environment.
5.Desktop Virtualization offers major savings on expending on physical computer systems by easily installing and configuring VMs on a single computer system

Limitations
1.Compatibility – Not all applications can be virtualized easily.
2.Potential security risks if the network is not properly managed.
3.Some loss of user autonomy and privacy.
4.Challenges in setting up and maintaining drivers for printers and other peripherals.
5.Difficulty in running certain complex applications such as multimedia.
6.Increased downtime in the event of network failures.
7.Complexity and high costs of VDI deployment and management

Thursday, February 9, 2012

Add the Command Prompt to the Windows Explorer Right-Click Menu

A hidden functionality in Windows allows you to right click on a directory, and select “Command Prompt Here” from the menu.
Here’s the registry hack to get this working. Make sure you back up your registry just in case. it’ll show you the step-by-step method, but you can skip down to the bottom for the alternate reg file.

Step-By-Step Method:
Type regedit.exe into the Start\Run dialog, and then navigate to the following registry key:

 HKEY_CLASSES_ROOT\Directory\shell Once you are at that key, right click and choose the New Key option:
Name the key “CommandPrompt” without the quotes and then double-click on the default value. Change the text to “Command Prompt Here” as seen here:
Right click on the new Command key and select New key, as you did before. Name the new key Command as well, and then double-click the default value of that key. Set the text of that key to this: cmd.exe /k cd %1 You can see what it should look like here:
Now when you right click on the folder, you should see this dialog:
That will open up a prompt like this:
Alternate method: You can create a text file named anything.reg, and insert this text into it:
Windows Registry Editor Version 5.00
[HKEY_CLASSES_ROOT\Directory\shell\CommandPrompt]
@=”Command Prompt:”
[HKEY_CLASSES_ROOT\Directory\shell\CommandPrompt\Command]
@=”cmd.exe /k cd %1
Double click on that file, and the text will be entered into the registry, and you’ll have the same right click command prompt.

Share

Twitter Delicious Facebook Digg Stumbleupon Favorites More